Tuesday, March 31, 2009
Card - Technique-Stravaganza instructions - more cards
• Cardstock
• Rubberstamps
• White Stazon Ink
• Embossing Ink
• Embossing powder
• Heat Gun
• Stencils
• Memory Mist
• Color wash
• Dye Ink
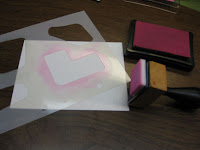
The same basic steps are taken for each of the cards in this batch of examples:
1. Start with a light colored piece of cardstock. Rubberstamp image repeatedly over cardstock using white Stazon ink. Let dry.
2. Spritz stencil with color wash and lay down on cardstock, then remove. Use a heat gun to dry the cardstock.
3. Ink all the edges with complimentary dye ink color.
4. Stamp sentiment/image with embossing ink, emboss using heat gun with embossing powder.
5. Adhere the card front to the card back.
Monday, March 30, 2009
Card - Technique-Stravaganza instructions
• Cardstock
• Rubberstamps
• White Stazon Ink
• Embossing Ink
• Embossing powder
• Heat Gun
• Stencils
• Memory Mist
• Color wash
• Dye Ink
The same basic steps are taken for each of the cards in this batch of examples:
1. Start with a light colored piece of cardstock. Rubberstamp image repeatedly over cardstock using white Stazon ink. Let dry.
2. Spritz stencil with color wash and lay down on cardstock, then remove. Use a heat gun to dry the cardstock.
3. Ink all the edges with complimentary dye ink color.
4. Stamp sentiment/image with embossing ink, emboss using heat gun with embossing powder.
5. Adhere the card front to the card back.
Sunday, March 29, 2009
Project Tutorial - Rainbow Butterfly Wall Art
Supplies
Cardstock (a rainbow of colors)
Butterfly stamps (3 sizes - ClubScrap)
Black ink
Pop dots
dye ink pads
sponge
Wall frame
Stickles
Instructions:
1. Choose 12 colors of cardstock varying from pinks, reds, yellow, oranges, greens, and blues in the colors of the rainbow.
2. Rubberstamp 12 large “Butterfly” (ClubScrap) stamps, 12 medium “Butterfly” (ClubScrap) stamps, and 12 small “Butterfly” (ClubScrap) stamps, one each onto the 12 colors of cardstocks in black ink.
3. Trim out the 36 butterflies.
4. Ink the edges (with complimentary colors of ink pads) of butterflies with a sponge.
5. Using a bone folder, score two lines on each butterfly along the ‘body’ of the butterfly. Slightly bend the ‘wings’ up.
6. Add pop dots to the body of the butterflies. I used either 1, 2, or 3 dots stacked on top of one another to give multiple layers of depth on the artwork.
7. Take frame, remove glass and adhere a black piece of cardstock to the frame backing.
8. Add the butterflies, attaching to the background black cardstock, as shown.
9. Embellish the butterflies with stickles. Let dry.
Hope you enjoy this tutorial - if you do, please leave me a comment - it helps me knowing that people are reading these tutorials and want to see more!!
Thanks for stopping by! Deb
Saturday, March 28, 2009
Book Box - Paisley Project
Friday, March 27, 2009
Card - Technique-Stravaganza
Oh oh oh am I ever thrilled it is Friday again....course I have soooo much on my plate. I just got the 2nd book in the Twilight series and have ZERO time to read it...why you ask? ohhh because I was handed our schools' yearbook project yesterday and I have to create - I think - 12 different collaged (digitally done) pages and there is hoards of photos that have to be carefully mushed together. It is a rather tedius job...I still haven't started any pages for PSL either - need to get on that...and worst of all...I have a thousand ideas running around in my head for some crafting/card making projects and I am dying to sit down and materialize the thoughts...I was going to play hookie from work today - but it sounds like hubby was too excited about that idea and wanted to take me place...uhhhh yehhhhh didn't sound like that was going to help me get any work done...soooo neva mind....
Thursday, March 26, 2009
Jewelry - Metal pendant with mini album
Wednesday, March 25, 2009
Plastic Envelope pocket/Journal
We took a clear platic envelope - I don't remember the size exactly - but roughly 8.5x11 (or larger), we folded it in half and did a bunch of fun things to it - to create basically a journal on one side and a pocket on the other - it ties closed.
Tuesday, March 24, 2009
Mini Album - CD Mailer album
This is one of ClubScrap's fabulous "Stamp kits" - from the FIZZ KIT...ohhhh it is just adorable - LUV IT!!!
It even has a lil lock and key - how utterly sweet!!!
Monday, March 23, 2009
Digital Hybrid - Calendar with Altered Clipboard
Supplies
Clipboard
Patterned papers
Modge Podge
Ribbons
Cropodile
Alcohol inks & applicator
Embellishments
1. Cut papers to fit clipboard. Ink edges. Adhere to the clipboard with modge podge.
2. Use alcohol inks to ink the metal clip on the board.
3. Use cropodile to punch holes in top of clipboard. Tie ribbons through the holes.
4. Add the flower and other embellishments as desired. Adhere with Crafter's Pick adhesive.
5. Print out digital layouts and insert into Clipboard!!
Have fun and Good luck - Debbie Weller aka DebDuzScrappin
Sunday, March 22, 2009
Snap Frame Layout
Saturday, March 21, 2009
Calendar - Wallet size
Supplies
Club Scrap's yearly digital Calendar kit
Cardstock
Hole punch
Ribbons
Ink
Scoring tool
1. Print out monthly calendars onto cardstock and trim them all out to the same size. Ink edges.
2. Score each page about 1.5 inches from the left edge.
3. Punch three holes. Add ribbons.
Good luck and have fun!! Debbie Weller aka DebDuzScrappin
Friday, March 20, 2009
Digital Hybrid - Collage Frame
I gave these as - I think - Mother's day gifts a few years back - I meant to keep doing these each year - as sort of a year end summary - and still need to do that - but just haven't gotten around to it just yet....just not enough hours in the day!!
Supplies
Digital layout - a collage of photos - I printed this at Costco in - I think 10x12
Mat board
Patterned paper
modge podge
Inks
Flowers
1. I used the Colossal sized papers from Club Scrap to create the folding mat board frame. So there is two pieces of large mat board and modge podged the papers on to it.
2. Add your printed out digital layout to the folding frame.
3. Ink all edges.
4. Add flowers and embellishments as desired.
Have fun and good luck!! Debbie Weller aka DebDuzScrappin
Thursday, March 19, 2009
School's in session...
Well I ran out of patience for school work and papers and books and and and ... all over the dining room table. We had put one of the desks in a kids' bedroom - but it turned into a storage space - not a work space...so Plan B...move both desks into the kitchen, along with a bookcase - now I can still help them do their homework as needed (since I will be close by) and still cook dinner. Hopefully we can keep their areas clean and fairly organized. The kiddos are quite excited (honeymoon period I am sure...) about their newly organized desks.
So far so good! Debbie
Wednesday, March 18, 2009
"St. Patty's Day" Rainbow Cake...
So my dear goooood friend, Angie, sent me a link for making a RAINBOW cake - and if you know me - I am a total Rainbow TieDye maniac....the minute I saw the photo of this cake - I HAD to make it!! I didn't even finish the email from Angie - I got right up and got the ingredients together...then....
I told them boys of mine to come inside, we were baking a cake...
Great time to practice those measurements and do a tiny math lesson for them as well as bake this snazzy cake.
I decided it would be a St. Patty's day cake - since it is a rainbow cake - what could be better than the pot o gold at the end of the rainbow!!
I did modify the instructions since I wasn't going for low-fat, I won't be eating it and I did want it taste good. So I just used a regular 'white' cake mix following the packaging instructions. I just didn't think I wanted a soda in my cake - too traditional I guess.
Now I didn't believe it when she said one box wasn't enough, but she was right - I got 6 cupcakes and one small 9 inch cake.
Here is the link to the instructions to make this cake.
If I were to make this again - I would go with just SIX colors - not 7 and skip the purple - it really faded and didn't look that good at all.
The cake tastes fantastic - but it really is hard to go wrong with Betty Crocker!!
I think this would be a fantastically fun treat for school or a party - I think kids would get a real kick outta them - they are soooo pretty!! I was hoping to take it to work - but that lil cake is just too little for all them big burley guys at work...maybe next time!!
Thanks for looking - Debbie Weller
Monday, March 16, 2009
Project Tutorial - Conversation Starters
The first night I brought it out at the table - the kids were SOOOOO all over it - they LOVE it and even hubby told me afterwards that it was a wonderful idea!! I think because the kids get to pick the cards out - they love being personally involved in that part and wanted to just keep doing card after card.
Supplies:
Small box (picked mine up at dollar store)
Patterned papers
Modge Podge
Embellishments (tags, brads, buttons, flowers, etc)
Cardstock (to print cards on)
Rubberstamps
Inks
1. Measure box and cut papers to fit, modge podge onto box using a foam brush. Let dry.
2. Add embellishements - I added a tag and paper flowers with brads on top, brads along lid edge, and buttons in lower right hand corner front.
3. Print out sayings, quips, questions, etc onto cardstock. Trim to fit in your box.
4. Rubberstamp the cards with various images, just to spice em up a bit.
If you want a copy of my Word Document that has the sayings, questions, etc - just leave a comment or email me and I will email you a copy.
Good luck and have fun!! Debbie Weller
Sunday, March 15, 2009
Cards - New Baby cards
Well I had a fantastic time making these cards - didn't necessarily stick with exact traditional baby colors but hey why always stick with the same old thing, right?
Supplies:
ClubScrap Greetings To Go card making pack (15 card backs)
Rubberstamps
Clear embossing powder
Ink pads
Vellum
Sponging tool
Stencil (ClubScrap)
Shrink Plastic
Hole punch
Colored floss & needle
1. Take stencil and sponging tool and ink two different colors of inks in various spots all over the card front.
2. Rubberstamp images onto vellum, clear emboss if your ink doesn't dry quickly. Tear images out. Ink edges of torn images.
3. Rubberstamp images with permanent ink onto shrink plastic. Cut images out. Punch holes in them. Using Heat gun - shrink the images.
4. Take floss and sew the vellum images onto the card front.
5. Tie the shrink plastic image onto the card front.
6. Add any additional stamped images to card front. Ink edges of card front.
7. Adhere card front to the card back. Stamp sentiment inside.
Hope you enjoy!! Have fun and good luck!! Debbie Weller aka DebDuzSrappin
Saturday, March 14, 2009
He did it....
Yep my darling child ate one of them little Larvet bugs...ewwwww just nasty ickie-ewww
I think the worst part was - that the darn bug got suck in his throat and would go down - I think it was too dry. So then we spent the rest of the evening trying to get it to go down - so he didn't get to try the Cricket...
We will have to try the Cricket in a few days...hahahaha
I am sure it will be just the perfect thing for him and a few of his buddies to do a dare and all eat...course who knows how much trouble I'd get into with the other moms!!! Hey maybe they won't let their kids come over anymore...gee no more playdates - BUMMER!! hahahahahaha
Wednesday, March 11, 2009
Tuesday, March 10, 2009
Fun Lady....ME?
So anyone here watch Seinfeld religiously? Anyone remember the episode where Elaine goes to the doctor and they write in her file that she is difficult?
Soooo this is a little along those lines...see I went to get my hair permed today and I go to the local Hair School for all my perms. Well they keep lil cards on file about your past perms - so they can know what to do for future perms, right?
Well she had my cards sitting there and it says my name, what color of perm rods for what sections of my hair, the style of my perm, time for how long the solution is on the hair, etc...and then at the lower section it says *results: Nice curl, Fun Lady* FUN LADY...hahahahah.... that is funny to me, cuz I don't think I am *fun enough* that someone would actually WRITE it down...especially when dead sober & bored stiff after 5 freakin' hours at the Hair school...
And then LADY - really am I THAT old - that people (upper teens/young adults) would really call me LADY? hahahahaha I still just don't feel as old as I am apparently becoming!!!
ok welp that is my blurp for the day - bed time for this "young at heart" lady!!
Would YOU???
Would you try these? These are *delicious* looking "Crickets" and "Larvets"!!!
Hummm yes in some of your all time favorite flavors. I mean who can pass up the age old favorites of 'Cheddar cheese' or 'BBQ' flavors? Or maybe you prefer the new more stylish flavors of 'Vinegar & Salt', 'Cheese & Bacon', or 'Sour Cream & Onion'? ohhhh you prefer a bit of spicy...hey try 'Mexican Spice'!!!!
Hahahaha - nice huh? My lovely co-worker brought these to work and try to talk all of us into trying these - and number of folks really did - NOT ME - but other folks!!!!
Well now that I helped all those dieters out there - with giving them the yaaks at the thought...I will sign off for now and head to work!!