Friday, January 31, 2014

Drippy Style Graffiti GTG card

1.  Stamp "Style" in black india ink.
2. Color in word with yellow and orange sharpies.
3.  Outline word with light blue sharpie and draw 'drip' marks off bottom of word.
4.  Using 'brick' stencil and a silver sharpie, draw bricks around outside of word.
The majority of the materials used in this project are from ClubScrap. TFL DebDuzScrappin

Wednesday, January 29, 2014

Graffiti Blog Hop - Bookshelves Club Stamp Project

Graffiti Blog Hop
"Bookshelves" Club Stamp Kit - "Greeting Card Keeper" 

 Welcome to this month's ClubScrap Blog Hop!

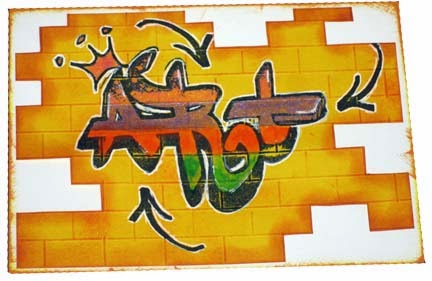
To create the decorative portion of the front of the album, follow these steps:
1.  Spritz a non-stick craft sheet with various color sprays, glimmer mist, etc.
2.  Press the cardstock front pieces into the liquid colors, remove, dry with heat gun.
3.  Use Fizz kit stencil and spritz glimmer mist in various locations on cardstock.  Dry with heat gun.

4.   Use Aurora Borealis stencil and white gesso to add additional dimension to cardstock:
5.  Once dry, adhere to the album per instructions in kit.
6.  Using black india ink, rubber stamp images from Graffiti kit, Up, Up, & Away kit, and Wild Flower kit on to front and back panels as shown.  Outline each black image with white ink.  I used white gel pen.

7.  Finish up project per instructions and lastly add some handmade greeting cards in the keeper.
Thanks for visiting my blog during the ClubScrap Blog Hop!

Wanna see some more great creative ideas using this month's Graffiti kit from ClubScrap???  Just check out the next participant in the Blog Hop, please visit Jill P's Blog for more!  You can also visit ClubScrapCreates for the full list of participants.

The majority of the materials used in this project are from ClubScrap. TFL DebDuzScrappin /a>

Tuesday, January 28, 2014

"Style" Graffiti GTG card

 Simple card
1.  Rubberstamp "Style" word from Club Scrap's Graffiti kit.
2.  Color in word with yellow and orange sharpies.
3.  Using 'brick' stencil color in with light brown sharpie.
4.  Using a white gel pen, draw an L shape line on each brick in lower left hand corner.
5.  Spritz card with light brown color spray, let dry.
The majority of the materials used in this project are from ClubScrap. TFL DebDuzScrappin

Sunday, January 26, 2014

"Art" Graffiti GTG card

 "Art" Graffiti GTG card

 My son even made a card using this technique:

INSTRUCTIONS (as previously posted)
Pretty quick and simple technique using this month's Graffiti kit.
1.  Rubberstamp Graffiti word onto white cardstock.
2.  Using a pen or pencil circle the word using jagged edging around the word.
3.  Color the outer section of the card with a fairly light color - I used sharpie pens for coloring.  Then I went over the outline of the pencil/pen with a black sharpie and added the jagged 'cracks' around the outside.
4. Colored in the rest of the card as shown:
5.  Lastly, I used the white gel pen to add white highlights here and there as shown.

The majority of the materials used in this project are from ClubScrap. TFL DebDuzScrappin

Friday, January 24, 2014

"Love" Graffiti GTG card

 "Love" Graffiti GTG card


Pretty quick and simple technique using this month's Graffiti kit.
1.  Rubberstamp Graffiti word onto white cardstock.
2.  Using a pen or pencil circle the word using jagged edging around the word.
3.  Color the outer section of the card with a fairly light color - I used sharpie pens for coloring.  Then I went over the outline of the pencil/pen with a black sharpie and added the jagged 'cracks' around the outside.
4. Colored in the rest of the card as shown:
5.  Lastly, I used the white gel pen to add white highlights here and there as shown.

The majority of the materials used in this project are from ClubScrap. TFL DebDuzScrappin

Wednesday, January 22, 2014

Graffiti on Bricks

  Graffiti Cards


Here is a real simple way to create the look of bricks for using with the graffiti stamps from this month's ClubScrap kit.

Supplies:
Cardstock
RubberstampsInks
Glimmer spray

Instructions:
1.  Using a score pal, score in one direction every 1/2 inch across the entire piece of cardstock, flip to the other direction and score every 1 inch, alternating as you move down the cardstock creating the "brick" look:

 2. Ink all of the raised edges with light brown ink, thus making the bricks POP!!
3. Cut out various sections of the bricks as shown.
4. Ink edges of card with green ink using sponge dauber.
5. Stamp Misty Drip image with orange ink onto cardstock.  Stamp "Happy Birthday" sentiment with black india ink.

5. Mat onto cardback.

The majority of the materials used in this project are from ClubScrap. TFL DebDuzScrappin

Monday, January 20, 2014

Bubble Graffiti "Art" GTG card


1.  Stamp ART in black india ink on white cardstock.
2.  Color in word with yellow sharpie.
3.  Outline word with teal sharpie.  Using Stencil, color in different sized circle in teal around the word.
4.  Repeat using stencil, coloring in circles all around word but using blue sharpie.

The majority of the materials used in this project are from ClubScrap. TFL DebDuzScrappin

Sunday, January 19, 2014

I'm Nuts & Bolts about you!!! V-day ideas

Is Valentine's day coming again already?

Here is a Valentine's day "Monster" box my kiddo and I worked up:

Here is some cute "robots" for giving as Valentine's at school for his classmates:

The majority of the materials used in this project are from ClubScrap. TFL DebDuzScrappin

Friday, January 17, 2014

Party in a Box

Sent a Birthday-in-a-Box to a dear friend and a Happy-Mom's-Day box to my favorite mom!  Wrapped the inside of the boxes with wrapping paper an included all the goodies you'd need for a party! I thought this would be a fun way to send some fun and love to those too far away to be with for their special day!!


The majority of the materials used in this project are from ClubScrap. TFL DebDuzScrappin

Tuesday, January 14, 2014

ClubStamp Navajo Album kit project

Love this fun album from Club Stamp "Navajo" kit.


 So many fun little pockets and pages in the album!!

The majority of the materials used in this project are from ClubScrap. TFL DebDuzScrappin

LinkWithin

Related Posts Widget for Blogs by LinkWithin