Tuesday, December 30, 2008

Address Book project....


How great is this fabulous Address Book kit from ClubStamp's Simply Beautiful kit? The kit came with pre-punched holes for the binding, the binding, and all the preprinted interior address pages....gotta luv that!!!

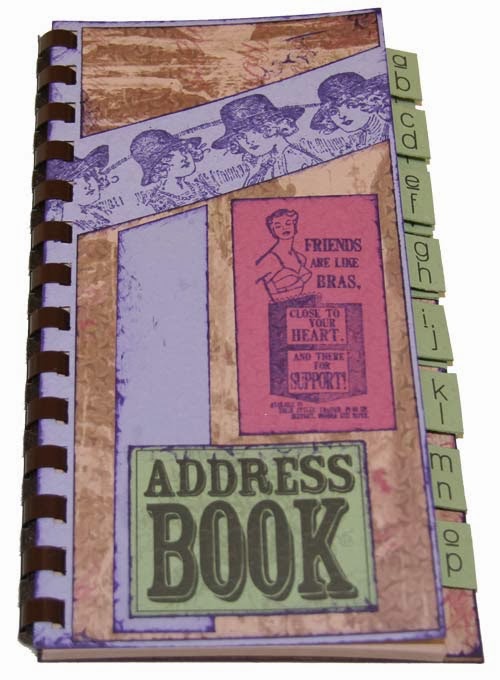
I also got to *finally* use one of my favorite CS rubberstamps "Friends are like bras, close to your heart...and there for support!" Too funny!!!

Sunday, December 28, 2008

Domino Wall Art

Supplies:

16 Dominos
Gold ink: Brilliance
Copper ink: Brilliance
Black ink: Stazon
All rubberstamps: Club Scrap
Glue: Crafter’s Pick
Black acrylic paint
Mat board
Heat gun

Instructions:

1. Ink edges and the back (flat) side of 8 Dominoes in gold ink and 8 Dominos in copper ink. You will need to heat set each side as you ink it to set the ink and make it dry.
2. Once ink is dry, arrange your dominos as shown in diagram.
3. Choose your rubberstamps and stamp images and sentiments with black Stazon ink, let dry.
4. Ink top edges of each domino to sort of “frame” the words and images. You can do this either direct-to-pad or using a sponge for a softer look. Let dry.
5. Cut a piece of mat board just under 5in x 5in. Paint the center of the mat board black. Let dry.
6. Apply glue to mat board all around the edges (not in the very center where there will be no domino) and start adhering the dominos to the mat board. I also put a bit of glue on the edges of the dominoes to ensure they would hold together (especially on those few dominos that hang over the edge of the mat board).
7. Glue hanger to back of mat board, let dry.

Finished wall hanging is approximately 7in x 7in.

Good luck and have fun!!
Debbie Weller
DebDuzScrappin.com

Another Domino Project - Frames!!


Saturday, December 27, 2008

Domino Serving Tray


This is a beautiful tray, makes a great gift item. You can also put a hanger on it, and hang it on the wall. The tray you get at Walmart is not real large, so nice size for the wall. Depending on your tray, you may need to cut one of your dominos in half to make it all work perfectly. I had my hubby cut it with the bandsaw, but he said you could use a handsaw or stroll saw as well. Also if your particular tray has a small gap along the edge, you could run a small piece of dowel along each edge of the tray to eliminate the gap. Mine had a tiny gap, too small for a dowel, so I just centered all my dominoes and left the tiny gap. Most all rubberstamps in project shown are from Club Scrap.

Supply List:
Unfinished serving tray
Dominoes, Jumbo size (1.5 in x 2 in)
Crafter’s Pick glue or other permanent glue
Black spray paint
Cotton Balls
Various Rubberstamps
Stazon ink (or you can use Brilliance inks)

Instructions

1. Spray paint wooden tray. I recommend painting several light coats, letting each coat dry before apply additional coats, until tray is solid black on all edges, front, and back.
2. Use Stazon ink and ink all four edges of the dominoes. I just took the domino and slide it right over the ink pad to ink up the edges. Set aside to dry for a few hours or overnight.
3. Place dominoes into tray however you find attractive to the eye, I usually do two horizontal and then two vertical across the whole tray. If I have a large stamp, then I would use three dominoes in a row and then a single in another spot with a small rubber stamp.
4. Chose your rubberstamps and pull out which ever set of dominoes you prefer to use. If you use mounted rubberstamps you can stamp directly onto the set of dominoes. With unmounted rubberstamps, I find flipping the rubberstamp upside down and pressing the dominoes onto the stamp gives you a better image. When using the Stazon ink, clean your stamps immediately after using them. Stazon makes a special ink remover as well. Once image is on dominoes, place back into tray, being careful not to touch image (otherwise you might smear it). Let all images dry for a few hours or overnight before proceeding.
5. Now that the images are dry, take a cotton ball and dab into the Stazon ink and dab the edges of the front of each domino around the image. This gives the dominoes a more muted edge versus the sharp edge from step 2’s inking edge. Let this dry for a few hours.
6. Now at this point, if you want to seal your dominoes with a spray sealer, go ahead and do that. Let dry.
7. You will want to work fairly quickly on this step, so that the glue doesn’t dry completely before you get all your dominoes into place and properly centered. So once all the ink is dry, then remove a few of the dominoes at a time and apply glue to the tray and set your dominoes into the glue. By doing just a few at a time you won’t mess up your pattern and layout. Use a glue that dry clears, just in case any glue creeps up through the cracks. Let this dry.
8. Now I did not seal this myself, if the tray is to be used as a tray, you may want to apply a sealer of some sort, I am guessing a brush on sealer would be best.

Good luck and have fun!
Debbie Weller
a.k.a. DebDuzScrappin

Thursday, December 25, 2008

Merry Christmas and Necklace Holder project!


This is another one of Club Stamp’s fabulous monthly kits. Kind of hard to see it in the photo, but there is 5 hooks at the lower bottom of this hanging piece of art. This can be a necklace or even a great key holder.

Supplies needed:

* Club Stamp kit – includes board, hooks, paper clay.
* Rubberstamps
* Inks
* fibers
* Crafters Pick adhesive
* Eyelets
* Eyelet setting tools

1. The Club Stamp kit provides instructions for putting the main project together.
2. I embellished the hooks with flower beads.
3. I rubberstamped the “Let me count the ways” HAND rubberstamp into the paper clay, inked edges and adhered using crafter’s pick
4. I used frilly fibers to wrap around the paper clay image, to wrap around the base at the top of the hooks, and as the piece strung through the eyelets, to hang the holder from a hook on the wall.

Used the Let Me Count The Ways Kit from Club Scrap for papers and rubberstamps in this project.

Wednesday, December 24, 2008

Hand stitched Mini Book


Here is a quick quick quick little mini book project that came in my Club Scrap kit - it is a handstitched binding them inserted into this plastic cover. Added the woven ribbon and stitched the clasp onto the cover, added some charms and vola' - done!!

Tuesday, December 23, 2008

Private Eye Steno Book

I finished this fun Steno Book project up on Sunday whilst my kiddos messed around doing spin art. This project is from Club Stamp's Private Eye (October's kit).

This is a very fun kit - as all of the pages are pre-cut and punched with the spiral binding. The pages are all different sizes and shapes and gives lots of depth and variation to this fun book. When the time is right I will toss a few photos in, do a touch of journaling and perhaps give as a gift to one of the grandparents. Hard to tell in the photos but I tied a bunch of charms and doo-dads onto the spiral binding as well.

Ok I am off to bed!!

Sunday, December 21, 2008

Kalediscope project!!


Here is the super fun and really cool project from Club Stamp's November "Mirror Mirror" kit.

This is a Kalediscope - one of the easiest projects I have done in a while with a way fun outcome and boy oh boy did my kids LOVE it!! It works just like a real Kalediscope just using beads and papers and such - all in the kit from Club Scrap! Too fun.

This is a great project to do with your kids!!

Saturday, December 20, 2008

Christmas Card 2008


Merry Christmas from us to you!!

This is a digital scrapbook page that I am using as our Christmas card this year.

I used the red and purple digital scrapbook papers from Club Scrap's Wheels and Sprockets Digi-kit.

Friday, December 19, 2008

Christmas - Ornamants - Paper "Star"

Supply List:

Scrapbook paper or cardstock
Rubberstamps/Ink
Scoring blade or bone folder/ruler
Stapler/staples
Red Line tape
Scissors

Instructions:

1. If you are using single sided pattern paper, cut a piece that is 12in x 6in, fold in half and adhere them together, creating a 6in square. If you are using double sided pattern paper or card stock, cut into 6in x 6in squares.
2. If you intend on rubber stamping, do that now.
3. Using a scoring blade, score 5 lines each at 1 inch intervals.
4. Accordion fold the paper together at the score lines.
5. Staple in the center of the accordion fold at 3 inch mark.
6. Looking at your accordion fold, you are going to determine which side to trim. You want to trim starting at the 2 inch mark on the side that has the two loose flaps rather than all folds. Cut down from the 2 inch mark to the tip of the outer edge, this will create the point on the star.
7. Open up each of the 'arms' of the star and adhere the upper and bottom ones with some strong adhesive, like red line tape. You will use approximate 1/2-3/4 inch of red line tape at the very center of the star
8. Add ribbon at top, add embellishment on front, if desired.

Good luck and have fun!!
Debbie Weller
DebDuzScrappin.com

"Advent Tree" Altered Cookie Sheet


"Advent Tree"
Altered Cookie Sheet

Supplies:
1 metal baking pan
Alcohol Inks: Ranger Industries
Inks: Ranger Industries
Plastic Disks: Rollabind
Glossy Accents: Ranger Industries
Small circle magnets:
Glue Dots
Rubberstamps: Club Scrap
Pattern paper: Club Scrap
Modge Podge
Polycrylic Gloss Overcoat

Instructions:

1. Using felt applicator, and a q-tip as needed, apply cranberry alcohol ink to the edges and inside of the metal baking pan. Let dry.
2. Cut background pattern paper to fix the backside of the metal pan, round corners. Ink edges.
3. Apply a coat of modge podge to the backside of the metal pan, put down the pattern paper, apply another coat of modge podge. Let dry.
4. Take pattern paper with the tree image, and carefully tear out the tree. Ink edges of the torn image.
5. Apply a coat of modge podge to the backside of the tree image and lay image down onto the background paper, apply another coat of modge podge over tree image.
6. Take pattern paper with ‘presents’ images, cut out presents, ink edges.
7. Stamp an image of the “sled” on the red cardstock and the “star” on cream cardstock, trim out image, ink edges.
8. Apply a coat of modge podge to the backside of the “presents” and “sled” images and lay images down onto the background paper at the base of the tree, place the “star” at the top of the tree, apply another coat of modge podge over these images. Let dry.
9. Once completely dry, spray entire backside of pan with a clear polycrylic protective spray. Do 2-3 coats, allowing appropriate dry time in between coats per instructions on canister.
10. To create the “ornaments,” get 25 white rollabind disks. Using alcohol inks, color the oraments with eggplant, caramel, cranberry, and pesto. Let dry.
11. Punch small cream colored circles that fit inside the rollabind disks.
12. Stamp numbers 1 through 25 onto the circles.
13. Put a drop of glossy accents into the rollobind disc, then place the circle punch in, press into the glossy accents, finish by covering the circle with a coat of the glossy accents. Let dry.
14. On the backside of each rollabind disc, use 3D glue dots to attach magnet discs.
15. If your pan doesn’t have a hole in the upper handle, you can drill one. Now you can hang on the wall. You can store all the magnets on the inside of the pan and add them one at a time for each day to the front of the pan on the “tree”.

Good luck and have fun!!
Debbie Weller
DebDuzScrappin.com

Wednesday, December 17, 2008

Cards - "George Gogas" cards

My 8 year old son, AJ, brought this inspiration to me. He had gone to our local art museum and saw some artwork created by artist, George Gogas. When he got home from school, he created his own version of some of the art he’d seen in the museum. I loved his little art project, as I started in awe at my child’s gorgeous artwork, I immediately began brainstorming how I could incorporate rubberstamps into the art and modify my son’s technique a little bit to suit my needs.

Supplies needed:

¨ Watercolor paper
¨ Rubberstamps
¨ Permanent (or Pigment) ink pad (black)
¨ Mat board or cardboard
¨ Permanent Black marker
¨ Painter’s Tape or other masking medium
¨ Watercolor brush
¨ Dye Ink pads

1. Cut watercolor paper into desired card front size.

2. Cut a piece of cardboard or matboard into a shape, I used an “L” shape in all of these pieces. But you could do any shape.

3. Using a permanent black marker, outline the mat board piece. Now move the piece to a new location, and outline again. Continue moving around and overlapping until satisfied with the look.

4. Use removable painter’s tape to mask of sections of the outlined areas. Using pigment or permanent ink, rubber stamp image (s) into the area you have masked around. Be sure and let your ink dry completely before moving onto your next section if using pignment ink. Repeat this process by moving the masking around to a new location, stamp image (s). Continue same process until the card front is stamped to desired look.

5. Using a watercolor brush, pick up ink from a dye-ink ink pad and paint in the squares, as shown. Let dry.

6. Adhere to card back.

Tuesday, December 16, 2008

Inch by Inch...


Do you have a lot of that beautiful CLUB SCRAP scraps laying around? Or pounds and pounds of POPS waiting to be fondled and turned into some HAPPY wall art??? This piece of art work really really just makes me smile everytime I look at it…when I told my hubby that it makes me happy to look at it, he said – “Make a whole bunch of them, and hang em all over the house!!” What a guy!! Most all supplies used in project are from ClubScrap.com

Supplies needed:
>Frame – this particular frame I used is actually a corkboard that I just painted black
>Cardstock, patterned and colored (Club Scrap)
>Embellishments, like fibers, brads, clips, buttons, charms, flowers, etc.
>Crafter’s Pick adhesive
>Stickles glitter glue (this is the best stuff, don’t waste your time with cheap alternatives IMO)


1. Cut the following:

(9) 1 in. x 1 in. squares in shades of PINK (Kits: Fizz, Stratosphere)
(9) 1 in. x 1 in. squares in shades of RED (Kits: From the Heart, LMCTW, Wheels/Sprockets)
(9) 1 in. x 1 in. squares in shades of ORANGE (Kits: Salsa, Poetic, Avante Garde, Rhapsody, Bistro, Surfs up)
(9) 1 in. x 1 in. squares in shades of YELLOW (Kits: Mosaic, Rhapsody, Poetic, Down to Earth, Bistro)
(9) 1 in. x 1 in. squares in shades of GREEN (Kits: Refresh, Mosaic, Outdoors, Farmers Market)
(9) 1 in. x 1 in. squares in shades of TEAL (Kits: Avante Garde, Refresh, Mosaic, Serengeti)
(9) 1 in. x 1 in. squares in shades of BLUE (Kits: Refresh, Interior Design, Farmers Market,Sparkle)
(9) 1 in. x 1 in. squares in shades of PURPLE (Kits: Simply Beautiful, Wheeles & Sprocket, Retro, Be Still)
2. Ink all edges of all the little ‘inchies’ with a complementary colored ink.

3. Rubberstamp various words, images, and sentiments in black ink onto squares.

4. Add any embellishments you have in your stash that matches the color family you are working with….like flowers, game pieces, fibers, safety pin, brads, clipiolas, etc

5. Adhere the inchies to the black frame using Crafter’s Pick adhesive. Let dry.

6. This step REALLY adds to your project IMO - Add Stickles (glitter glue) as a final decoration. Do little dots, maybe centers of flowers or stamped images, outline the inchies, whatever looks good. Let dry.

Good luck and have fun!
Debbie Weller
a.k.a. DebDuzScrappin

Monday, December 15, 2008

People Feeder!!


Saw this cute idea back at Halloween for a "People Feeder" at a craft store (can't remember off the top of my head, which one...) - and decided to make a Christmas version of it. It is just a wooden bird feeder, that I painted all snazzy looking in red, yellow, green and white. I then filled it with M&M's and yogurt covered pretzels. The "elves" left this lil thing the second night they were visiting.

I think you could make one of these up for just about any holiday-Think green clovers on St. Patty's day, pink/yellow/green at Easter, Halloween of course, ohhh and let's not forger red/white/blue for 4th of July!! I'm sure there is others...

Ok off to tuck wee ones into bed!!

Sunday, December 14, 2008

Wine Glass Charms


Made these fun little wine glass charms as a small gift for the hostess of a cocktail party I was invited to last weekend - I used all sorts of various beads from my yummy lil bead cups that accompany my Club Scrap monthly scrapbooking kits and then attached them to some of the Club Scrap's "Let Me Count The Ways" kit's cardstock. I made a total of 6 charms using memory wire all in different shades of colors.

Supplies needed:

Cardstock, patterned and colored (Club Scrap)
"Holiday" Rubberstamps (Club Scrap)
Memory wire (ring size)
Beads
Jewelry tools
Wire
Piercing tool
1. Cut 6 pieces of memory wire approximately 1.5 loops long.

2. Bend one end of memory wire with tools to create a loop.

3. Thread beads (and charms if desired) in various shades of color (for example one wine charm red, one green, one blue, and so on)

4. Once you have all your beads on, use tools to create end loop.

5. Cut piece of pattern cardstock, rubberstamp holiday greeting and images. Ink edges.

6. Pierce six small holes across the paper.

7. Attach the charms to the paper by threading wire through the hole, around the charm, and back through the hole. Tape the wire on the back side, to hold in place. Mat entire piece onto another larger piece of cardstock, ink edges.

Good luck and have fun!
Debbie Weller
a.k.a. DebDuzScrappin

Tuesday, December 9, 2008

Cards - "Inchies" standard cards


A Rainbow of "Inchie" Cards

Supplies needed:

* Cardstock, patterned and colored (Club Scrap)
* Rubberstamps & Ink
* Embellishments, like fibers, brads, clips, buttons, charms, flowers, etc.
* Crafter’s Pick adhesive or Glossy Accents
* Stickles glitter glue (this is the best stuff, don’t waste your time with cheap alternatives IMO)

1. Cut the following:

¨ (15) 1 in. x 1 in. squares in shades of PINK (Kits: Fizz, Stratosphere)
¨ (15) 1 in. x 1 in. squares in shades of RED (Kits: From the Heart, LMCTW, Wheels/Sprockets)
¨ (15) 1 in. x 1 in. squares in shades of ORANGE (Kits: Salsa, Poetic, Avante Garde, Rhapsody, Bistro, Surfs up)

¨ (15) 1 in. x 1 in. squares in shades of YELLOW (Kits: Mosaic, Rhapsody, Poetic, Down to Earth, Bistro)
¨ (15) 1 in. x 1 in. squares in shades of GREEN (Kits: Refresh, Mosaic, Outdoors,
¨ (15) 1 in. x 1 in. squares in shades of TEAL (Kits: Avante Garde, Refresh, Mosaic, Serengeti)
¨ (15) 1 in. x 1 in. squares in shades of BLUE (Kits: Refresh, Interior Design)
¨ (15) 1 in. x 1 in. squares in shades of PURPLE (Kits: Rhapsody)

2. Ink all edges of all the little ‘inchies’ with a complementary colored ink. (If you are a little lazy and not a true perfectionist like me, you can do this step after STEP 4 – makes it go a little faster.)

3. Rubberstamp various words, images, and sentiments in black ink onto the various squares.

4. This step makes lining up your inchies and attaching your embellishments easier – you could skip this step altogether – but I prefer doing it this way. Cut a scrap piece of black cardstock 2.5 in x 4.5 in. Adhere your little inchies to this piece of cardstock

5. Add any embellishments you have in your stash that matches the color family you are working with….like flowers, game pieces, fibers, safety pin, brads, clipiolas, etc. Use Crafter’s pick or Glossy Accents (these both dry clear) if you need to glue items on – let dry.

6. Adhere the batch of inchies to your card front.

7. This step REALLY adds to your cards IMO - Add Stickles (glitter glue) as a final decoration. Do little dots, maybe centers of flowers or stamped images, outline the inchies, whatever looks good. Let dry.

Good luck and have fun!
Debbie Weller
a.k.a. DebDuzScrappin

Monday, December 8, 2008

Cards - "Inchies" Matchbook cards


Well I had a extra stash of tiny envelopes and decided to make a few cards to fit the envelopes – I can always use little cards to tuck in with gifts and these will certainly fit the ticket. I really love how colorful and happy these cards turned out. The other excellent thing about this project – is you can use up scraps of left over cardstock stash…and create beautiful little masterpieces!! Most all supplies used in project are from ClubScrap.com.

Supplies needed:

* Cardstock, plain black
* Cardstock, patterned and colored (Club Scrap)
* Embellishments, like brads, clips, buttons, charms, flowers, etc.
* Crafter’s Pick adhesive
* Stickles glitter glue (this is the best stuff, don’t waste your time with cheap alternatives IMO)

1. Cut (15) 1 in. x 1 in. squares from various shades of – same color family (i.e. all greens, all reds, etc) - plain and patterned cardstocks (Club Scrap).

2. Ink all edges of all the little ‘inchies’ with a complementary colored ink.

3. Rubberstamp various words, images, and sentiments in black ink onto squares.

4. Add any embellishments you have in your stash that matches the color family you are working with….like flowers, game pieces, fibers, safety pin, brads, clipiolas, etc

5. Adhere the inchies to the black cardstock back.

6. This step REALLY adds to your project IMO - Add Stickles (glitter glue) as a final decoration. Do little dots, maybe centers of flowers or stamped images, outline the inchies, whatever looks good. Let dry.

Good luck and have fun!
Debbie Weller
a.k.a. DebDuzScrappin

Sunday, December 7, 2008

Calendar - Perpetual

Here is a fun project from Club Scrap's "Refresh" Stamp Kit project...it is a perpetual calendar - how nice is that? Use it year after year - add all your dates to remember and hang'r on the wall!!

Saturday, December 6, 2008

My Scrapbooking room....

Here is just a few shots of my scrapbooking room - it is always a work in progress, as I search for the best way to store things and make more room for more stuff!!This is a shot of the table that sits to the right of me, that holds my UM stamps and you can see my old computer and the TV in the back area there...
This is the area for 'guests' which usually is my kids - they love to come in and do lil projects with me!
Here is the table that is located to my back - where I stack box after box of my YUMMY CLUBSCRAP kits!!
This is the holder of my "pounds of paper" that comes each month in my CS kits - they hang on the back of the door to my room.
Here you can see my storage shelf - I store bottles of paint, sizzix stuff, extra paper, you name it...
This is some cubies that sit to my left and I store various stuffin's.
These drawers are on my left, I store sizzix, inks, punches, colored pens, adhesives, some stamps, and hords of other goodies in these!!
This is above my work station - I store scraps of papers, paper, tools, embellishments, etc up here.
This is my work station...messy but it works for me for now...
Just another view!

Friday, December 5, 2008

Digital Scrapbooking101: Hybrid Projects

HYBRID PROJECTS

Besides just regular layouts you can do so many other fun projects – basically just by creating mini layouts and incorporating into other projects, here are a few fun projects I have done:

Thursday, December 4, 2008

Digital Scrapbooking101: Layout from Scratch

Option Three: ADVANCED

CREATE LAYOUT FROM SCRATCH

In this option you can purchase full digital kits that include various color coordinating digital papers, transparencies, fibers, alphabets, tags, digi-tools, brushes, embellishments like photo turns, brads, paperclips, etc. You can do all sorts of techniques and experiment away with creating all sorts of fun layouts with all the pieces/parts of these kits. There is a wonderful monthly kit available from ClubScrapDigital that I belong to and just adore!!

Here is a just a sampling of a few different ClubScrapDigital kits:

Wednesday, December 3, 2008

Digital Scrapbooking101: Layered Templates


Option Two: INTERMEDIATE

USING LAYERED TEMPLATES

Now if you are looking for a pretty fast, yet more flexible method of digital scrapbooking that gives you more control over your layouts – Digi-Templates might be the way to go for you. Digi-Templates are gray scale layered files that you can easily use over and over again with multiple papers. You can also resize or rearrange the location of photos, mats, paper piecings as well.

Here is an example of a blank digital template using the same format as in the pre-designed layout as used in Option 1. It is created with black, white and gray areas that you just fill in with patterned, plain papers and digital photos.

Here you can see that I took the simple digital template to the left. I rotated the template 180 degrees, added in papers into the various colored shapes, added a few digital brads, a digital tag with fiber and plunked in my journaling and it was done!!

LinkWithin

Related Posts Widget for Blogs by LinkWithin