Showing posts with label Inchies. Show all posts

Wednesday, March 30, 2016

Blog Hop - ClubScrap "Paris Flea Market" kit

Paris Flea Market Blog Hop!!

Today I am working with Club Scrap's Paris Flea Market kit.  This kit is totally Amazing!!  I am in love with the paper and the stamps, well really everything!!  Today I am making an "Inchie Holder"!!  I have done a number of swaps and this is a perfect way to organize and keep them.  This little tiny book holds 48 inchies - but you could make it more or less depending on your desires!!


Supplies:
Matboard
Cardstock
Ribbon (to tie book closed)
Embellishments (flowers, gems, charms, buttons, etc)

Instructions:
Cut 2 pieces of matboard 2.5x3.5in.  Cut pattern cardstock larger than mat board and cover as shown:
 On back cover, adhere a strip of ribbon, which will be used to tie the book closed.
 To create accordion fold - cut cardstock 9 3/8 by 3 3/8 inches, fold into 3 mountains and 4 valley's, adhere flat to back cover over ribbon.
 Adhere front flap to front cover:
 Cut 2 pieces of cardstock to cover the inside of the covers, 3 1/2 by 4 1/2 inches:
 Cut (9) 'flaps' that are 2 1/4 by 1 1/8 inches in size and adhere to the accordion fold:
 Here is what the closed and tied mini book looks like:
 If you don't already have inchies - make a bunch of them - like I did:
 Adhere them to the pages as shown
Here is a video:


Thanks for stopping by...now for more great stuff - go check out Josette's blog hop project!!!

The majority of the materials used in this project are from ClubScrap. TFL DebDuzScrappin
 photo Artistteambadge_rsz_zpsee8cbeff.jpg

Friday, October 15, 2010

Art - Thrinchies - White ones & VIDEO TUTORIAL


Here I made some red/black/grey/white flowers. You can see I rubberstamped some words onto the petals of the flower before putting it all together.

Here is the video tutorial on creating the Inchies/Thrinchies.


The majority of the materials used in this project are from ClubScrap. TFL DebDuzScrappin

Thursday, October 14, 2010

Art - Thrinchies - Purple ones

Last set - the Purple ones...I will be posting the Video Tutorial tomorrow.


The majority of the materials used in this project are from ClubScrap. TFL DebDuzScrappin

Wednesday, October 13, 2010

Art - Thrinchies - Red ones

Red Thrinchies!


The majority of the materials used in this project are from ClubScrap. TFL DebDuzScrappin

Monday, October 11, 2010

Art - Thrinchies - Orange/Yellow ones

Here is an orange and a yellow one Thrinchie - instructions coming soon.


The majority of the materials used in this project are from ClubScrap. TFL DebDuzScrappin

Sunday, October 10, 2010

Art - Thrinchies - Green ones

Here is the green set of Thrinchies I made. Instructions coming soon.

The majority of the materials used in this project are from ClubScrap. TFL DebDuzScrappin

Friday, October 8, 2010

Art - Thrinchies - ClubScrap Retreat swap

Here is a glimpse at the complete set of "Thrinchies" I made for ClubScrap's retreat. They are 3x3 inch mini pieces of artwork. I created color coordinated paper flowers to go on the different patterned pieces of cardstock all from various ClubScrap kits. I think they turned out wonderful. I will be posting details on these and a video tutorial as well.

The majority of the materials used in this project are from ClubScrap. TFL DebDuzScrappin

Thursday, October 1, 2009

Project Tutorial - Twinchies Part 1

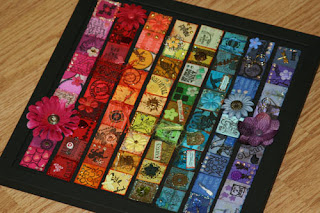
Ok so - as we speak - I am off on my annual fabulous ClubScrap (my favorite company EVER) Scrapbooking Retreat. Every year with as a group "trade" something - some years it was cards, other years ATC, Flair, etc. This year it is TWINCHIES...many of you have read my blog and know about INCHIES - which are small 1x1 inch lil squares of art. So in mulling over ideas - my sister (Thank you for such a great idea) said that I should make mini version of the piece of art that was displayed on the cover of Scrap & Stamp as my swap and so I tackled that task and here is what I came up with.

Supplies
9 colors of cardstock in shades of the rainbow
Black cardstock for the base
embellishments
Adhesive
Glitter glue

1. Cut 9 little squares a little less than 3/4ths of an inch in each color of the rainbow.

2. Adhere the little squares to the center of the black cardstock and let dry. I used modge podge for this.

3. Embellish squares using paper flowers, brads, charms, clips, buttons, etc. I used a clear drying adhesive like Crafters Pick or Glossy accents for this. Let dry.

4. Do a final touch up with glitter glue - use STICKLES brand - it really does the best job. Let dry.

5. Once you are done you can flip it over and sign it. I also decided to make lil cases for each of my twinchies as shown in picture 2 - check out tomorrow and I will post instructions on how to make them as well.

TFL
DebDuzScrappin'

Tuesday, December 16, 2008

Inch by Inch...


Do you have a lot of that beautiful CLUB SCRAP scraps laying around? Or pounds and pounds of POPS waiting to be fondled and turned into some HAPPY wall art??? This piece of art work really really just makes me smile everytime I look at it…when I told my hubby that it makes me happy to look at it, he said – “Make a whole bunch of them, and hang em all over the house!!” What a guy!! Most all supplies used in project are from ClubScrap.com

Supplies needed:
>Frame – this particular frame I used is actually a corkboard that I just painted black
>Cardstock, patterned and colored (Club Scrap)
>Embellishments, like fibers, brads, clips, buttons, charms, flowers, etc.
>Crafter’s Pick adhesive
>Stickles glitter glue (this is the best stuff, don’t waste your time with cheap alternatives IMO)


1. Cut the following:

(9) 1 in. x 1 in. squares in shades of PINK (Kits: Fizz, Stratosphere)
(9) 1 in. x 1 in. squares in shades of RED (Kits: From the Heart, LMCTW, Wheels/Sprockets)
(9) 1 in. x 1 in. squares in shades of ORANGE (Kits: Salsa, Poetic, Avante Garde, Rhapsody, Bistro, Surfs up)
(9) 1 in. x 1 in. squares in shades of YELLOW (Kits: Mosaic, Rhapsody, Poetic, Down to Earth, Bistro)
(9) 1 in. x 1 in. squares in shades of GREEN (Kits: Refresh, Mosaic, Outdoors, Farmers Market)
(9) 1 in. x 1 in. squares in shades of TEAL (Kits: Avante Garde, Refresh, Mosaic, Serengeti)
(9) 1 in. x 1 in. squares in shades of BLUE (Kits: Refresh, Interior Design, Farmers Market,Sparkle)
(9) 1 in. x 1 in. squares in shades of PURPLE (Kits: Simply Beautiful, Wheeles & Sprocket, Retro, Be Still)
2. Ink all edges of all the little ‘inchies’ with a complementary colored ink.

3. Rubberstamp various words, images, and sentiments in black ink onto squares.

4. Add any embellishments you have in your stash that matches the color family you are working with….like flowers, game pieces, fibers, safety pin, brads, clipiolas, etc

5. Adhere the inchies to the black frame using Crafter’s Pick adhesive. Let dry.

6. This step REALLY adds to your project IMO - Add Stickles (glitter glue) as a final decoration. Do little dots, maybe centers of flowers or stamped images, outline the inchies, whatever looks good. Let dry.

Good luck and have fun!
Debbie Weller
a.k.a. DebDuzScrappin

LinkWithin

Related Posts Widget for Blogs by LinkWithin