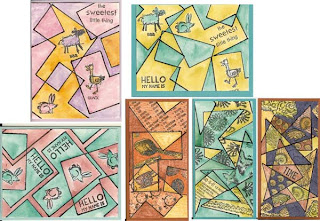
 My 8 year old son, AJ, brought this inspiration to me. He had gone to our local art museum and saw some artwork created by artist, George Gogas. When he got home from school, he created his own version of some of the art he’d seen in the museum. I loved his little art project, as I started in awe at my child’s gorgeous artwork, I immediately began brainstorming how I could incorporate rubberstamps into the art and modify my son’s technique a little bit to suit my needs.
Supplies needed:
 ¨ Watercolor paper
¨ Rubberstamps
¨ Permanent (or Pigment) ink pad (black)
¨ Mat board or cardboard
¨ Permanent Black marker
¨ Painter’s Tape or other masking medium
¨ Watercolor brush
¨ Dye Ink pads
1. Cut watercolor paper into desired card front size.
 2. Cut a piece of cardboard or matboard into a shape, I used an “L” shape in all of these pieces. But you could do any shape.
3. Using a permanent black marker, outline the mat board piece. Now move the piece to a new location, and outline again. Continue moving around and overlapping until satisfied with the look.
 4. Use removable painter’s tape to mask of sections of the outlined areas. Using pigment or permanent ink, rubber stamp image (s) into the area you have masked around. Be sure and let your ink dry completely before moving onto your next section if using pignment ink. Repeat this process by moving the masking around to a new location, stamp image (s). Continue same process until the card front is stamped to desired look.
5. Using a watercolor brush, pick up ink from a dye-ink ink pad and paint in the squares, as shown. Let dry.
6. Adhere to card back.
No comments:
Post a Comment