Saturday, December 28, 2019

Boy Bookmarks

So I my son requested a bookmark for a new book he is reading and I told him I would make him a few options to choose from...he had bought me some new embossing folders last year for Christmas, so I covered the cardstock with metal tape and ran them through the 2 folders for 2 of them.  I really thought he would like these, as he is big into computers and robotics, etc.  I then painted them with black acrylic paint, once dry - I lightly sanded them.  For the 3rd option, he is a big math buff and in 3 math classes this semester, so I stamped it with various math stamps and school related stamps - turns out this was his favorite one, he immediately started to try and figure out the math problem on it - too funny!!


 TFL DebDuzScrappin

Saturday, December 21, 2019

Modified Retiform Technique Cards

These cards are all done using the modified Retiform Technique.  I just stamped a few of the various stamps and sentiments on each card front, then used painter's tape (or you could use post it notes) to sponge on the ink outlines around the images, leaving a small white gap between each image...


The majority of the materials used in this project are from ClubScrap. TFL DebDuzScrappin

Tuesday, December 17, 2019

Spotlight Christmas Cards

Made some more cute christmas cards - I have a bunch of gift cards to send out, so I needed more cards to send them in...these are pretty simple, just added some pops of color by coloring the blocks with my acrylic pens.


The majority of the materials used in this project are from ClubScrap. TFL DebDuzScrappin

Saturday, December 14, 2019

Gnomes in the Woods cards

Made these cute little cards - I stamped some cute "Aspen trees" (Clubscrap kit) on watercolor paper, colored them with Weathered wood distressed ink and matted on colored cardstock.  Stamped "gnome" & "conversation bubble" along with various sentiments on separate piece of cardstock, cut out.  I colored gone with green and red acrylic pens.  Adhered cutout pieces to card front.


The majority of the materials used in this project are from ClubScrap. TFL DebDuzScrappin

Wednesday, December 11, 2019

Something Pretty

So I joined this Reddit group https://www.reddit.com/r/RandomActsofCards/ and one of the gals on the group made a request for something pretty for her wall.  She had moved across the country to take on a new job and has been working 60 hours a week, 6 days a week and feeling down and was hoping she could decorate her wall with pretty postcards from people.  So I opted to make her a pretty postcard sized piece of art, and this is what I made her:
I used watercolor paper and gelatos to color the images.  Various stamps from Clubscrap.

TFL DebDuzScrappin

Sunday, December 8, 2019

Christmas Card Exchange

Christmas Card Exchange

I am involved in an card exchange with a group of ladies online and here is a bunch of the cards I made for the exchange:


I chose 4 colors of paper and cut to size for the card fronts, then cut all 4 card fronts all identical patterns and mix up the colors.  Find different stamps to stamp on each panel - on the black panels I embossed white images with heat gun.  I inked all the edges with red ink before adhering to card backs.  Embellish card front images with stickles.

The majority of the materials used in this project are from ClubScrap. TFL DebDuzScrappin

Monday, October 1, 2018

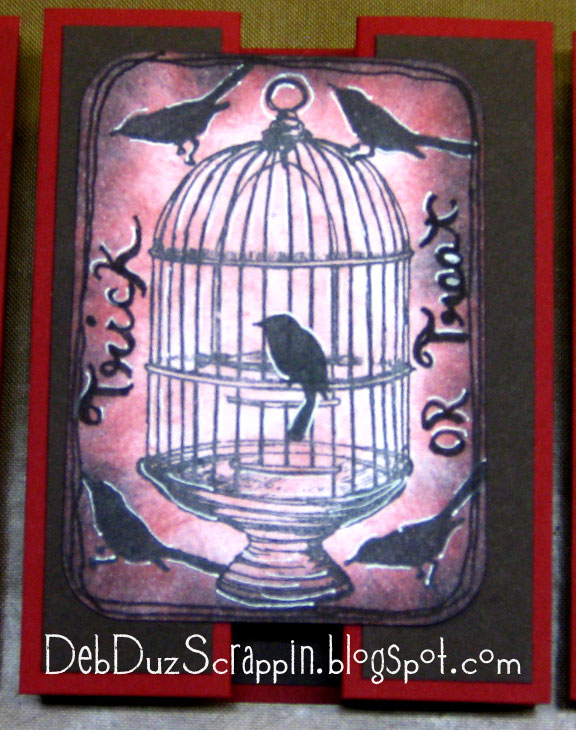
Frightful & Delightful Cards


Supply List:
Cardstock
Stamp pads (black, red)
Rubberstamps
Gel pen, white
Black pen
Sponge dauber
Adhesive, permanent

Instructions:
1. Cut 2.5 x 3.5 white card panel, round edges.

2. On white card panel, use dauber and ink edges and front of panel with
red ink.
Ink just edges of panel with black ink.

3. Stamp various images in black or red ink.

4. Embellish images with white gel pen.

5. Use black pen to draw lines around outer edge of card panel and write
‘words’ (Potions/Trick or Treat).
6. Mat card front and adhere to card back.

************************************
Sea Serpent

Stamps: Club Scrap Navigation “Sea serpent”; Club Scrap Paris Flea Market “Chandelier”; Club Scrap Paris Flea Market “Bee”

Instructions:  On white card panel, use dauber and ink edges and front of panel with red ink.  Ink just edges of panel with black ink.

Stamp “chandelier”, “sea serpent”, and “bee” images in black ink. Embellish images with white gel pen. Use black pen to draw lines around outer edge of card panel. Mat card front and adhere to card back.
************************************
Fly by night

Club Scrap Bugs “Fly”; Club Scrap Homestead “Frame”; Club Scrap Neon doodles “Script”

Instructions:  On white card panel, use dauber and ink edges and front of panel with red ink.  Ink just edges of panel with black ink.
Stamp “frame”, “fly”, and “script” in black. Embellish images with white gel pen. Use black pen to draw lines around outer edge of card panel. Mat card front and adhere to card back.
************************************
Black bird

Club Scrap Paris Flea Market “Birdcage”; Club Scrap Paris Flea Market “Black bird1”; Club Scrap Take Wing “Black bird2”

Instructions:  On white card panel, use dauber and ink edges and front of panel with red ink.  Ink just edges of panel with black ink.
Stamp “birdcage” and “birds” images in black ink. Use black pen to draw lines around outer edge of card panel and write ‘Trick or Treat’. Embellish images with white gel pen. Mat card front and adhere to card back.

The majority of the materials used in this project are from ClubScrap. TFL DebDuzScrappin

LinkWithin

Related Posts Widget for Blogs by LinkWithin