 So the December ClubStamp Kit was this pen kit. It came with all the pieces/parts to create the pen, along with the box. Instead of using the "Milestones" kit that was the one for December, I chose to use "BeStill" kit - so that it would match the Journal I just did. I added four strands of beads with "school" themed charms. I have full intention of giving the pen and journal set as a gift to one of the kids' teachers this year - I think they will enjoy it!!
Sunday, January 4, 2009
Paper Covered Pen Kit
So the December ClubStamp Kit was this pen kit. It came with all the pieces/parts to create the pen, along with the box. Instead of using the "Milestones" kit that was the one for December, I chose to use "BeStill" kit - so that it would match the Journal I just did. I added four strands of beads with "school" themed charms. I have full intention of giving the pen and journal set as a gift to one of the kids' teachers this year - I think they will enjoy it!!

Saturday, January 3, 2009
Back up and running....FINALLY!!!
 Man getting a computer virus SUCKS...
I have spent three full days trying to eradicate the darn bug with NO luck...so I ended up just starting over...I tried to recover using the system tools with NO luck... fortunately I have a software program that automatically makes a copy of my machine weekly and I just restored to an earlier date and poof back up and running....and when I say poof - I mean a day later because that is about how long it takes to run the recovery... and that was a last resort... thankfully it worked and boy that program is worth every dime I paid. It is not the first time it has saved my fannie!!
Anyways in all that spare time I did manage to get some good stuff done - no wasting time surfin' without the machine!!
This was the fun project from Club Scrap's "Be Still" Stamp kit. It is a handstitched journal, each page is lined. It is a wonderful book.
Friday, January 2, 2009
Cards - Zutter Bind it all
 I just adore using my new Zutter Bind-it-all binding machine!! It is such a versatile machine as it can punch through a number of materials. It can punch through just about anything, as long as it is not too terribly thick. So beyond punching through just the typical paper, foam, and cardstock, it can also punch through wood, acrylic, and even some softer metals. Well I was having a great time binding small scrapbooks and projects, but I wanted to go beyond just binding and see how I could incorporate the great machine into making some fun cards.
Now I know this article is written basically referring to and using the Zutter machine, but what if you don’t own the machine? Well if you don’t happen to own a Zutter binding machine – you can most certainly improvise!! I am a great fan of improvising, especially when perhaps space and/or finances restrict you from owning all the gadgets on the market. So if you don’t have the machine, you can simply use a standard hand held ‘rectangular’ (or really any shape) hole punch. Use the hole punch to punch holes in the same pattern/design as shown and then just proceed.
After a little brainstorming, I came up with a number of ways to incorporate the use of my Zutter into this set of fun and unique cards. I chose not to use the actual metal binding that comes with the Zutter machine – as cards mail better when thinner. The metal binding that comes with the machine comes in a variety of sizes, but even the smallest was pretty thick for mailing, especially in a standard envelope. So by punching just the holes into your card fronts, you can keep a thinner card, yet begin to add some wonderful embellishments. In the examples shown, I chose a variety of techniques from tying to stapling to weaving the assortment of ribbons and fibers. The punched holes allow you to tie on fibers and you can rest assured, unless many adhesives, that they will be securely fastened to your card for their journey to the recipient. Once you have some fibers added, you can add the final embellishments of beads and charms to personalize your individual cards.
Supplies needed:
* Cardstock (Club Scrap)
* Rubberstamps (Club Scrap)
* Ink pads
* Fibers
* Ribbons
* Beads
* Charms
* Zutter Bind-it-all OR hand held punch
* Stapler
“Practice Hope” card
Cut 7 in. x 5 in. piece of brown cardstock, fold in half, ink edges with brown ink. Use Zutter binding machine or a rectangular punch, punch 3 holes on each side of the front of the card. Cut a 1.75 in x 3.25 in piece of green cardstock, rubberstamp “Practice Hope” (Club Scrap) sentiment in black ink on it, ink edges with brown. Mat on blue cardstock, ink edges, mat onto front of card. Thread fiber through holes (adhere on back side) and add beads. Finished card is 5x3.5.
“Beaded Beauty” card
Cut 7 in. x 5 in. piece of dark teal cardstock, fold in half, ink edges with brown ink. Cut green cardstock piece 3.25 in x 3.25, use Zutter binding machine or a rectangular punch, punch 6 holes on top of piece, ink edges with brown ink. Tie fibers, beads and charms to the card at punched holes as shown, adhere to card front. Rubber stamp “girl silhouette” (Club Scrap) and “Happy Birthday…” (Club Scrap) sentiment onto blue cardstock, ink edges and adhere to card front. Finished card is 5x3.5.
“Lucky Day” card
Cut 7 in. x 5 in. piece of brown cardstock, ink edges with brown ink. Use Zutter binding machine or a rectangular punch, punch 3 holes on each side, top and bottom as shown. Ink edges of a 1 in strip of green cardstock, add to left side of brown card front. Rubberstamp “Today is your lucky day” (Club Scrap) sentiment in brown ink on blue cardstock, ink edges, adhere to front. Weave frilly fiber through holes, creating two “X’s” at top and bottom as shown. Finished card is 5x7.
“HI” card
Cut 4.25 in. x 5.5 in. piece of green cardstock, ink edges with brown ink. Use Zutter binding machine or a rectangular punch, punch 10 holes on left side, tie frilly fibers through each hole. Cut brown cardstock 4.75in x 7in, fold in half, ink edges with brown ink, mat onto green cardstock. Rubberstamp “Arrow stripe” (Club Scrap) image with black ink on green cardstock, ink edges, mat onto brown card front. Rubberstamp “Just wanted…” (Club Scrap) sentiment in black ink on blue cardstock, ink edges with brown ink and adhere to front. Finished card is 4.25x5.5.
“Happy Everything” card
Cut a 8.5 in x 5.5 in piece of brown card stock, fold in half. Cut 4.25 in. x 5.5 in. piece of light blue cardstock, ink edges with brown ink. Use Zutter binding machine or a rectangular punch, punch 6 holes on each side. Cut a piece of green cardstock 4.25in x 4.25in, ink edges and adhere in center of card front. Rubberstamp “Happy Everything” (Club Scrap) sentiment in black ink in lower center. Thread frilly fibers through each hole zig-zagging your way from top to bottom, adhere fibers to back side. Mat this card front to brown card back. Finished card is 4.25x5.5.
“I appreciate you” card
Cut 7 in. x 5 in. piece of brown cardstock, fold in half, ink edges with brown ink. Use Zutter binding machine or a rectangular punch, punch 6 holes on fold side of the card back. Use a bone folder or scoring tool, score a line 3/4th from fold. Add strip of blue patterned cardstock to front. Rubberstamp “Flourish” (Club Scrap) and “I appreciate you…” (Club Scrap) sentiment on blue and green cardstocks, respectively, in black ink. Ink edges and mat onto brown card backing. Thread ribbon through each hole and overlap fold, staple to card as shown. Finished card is 5x3.5.
“Bouquet” card
Cut 7 in. x 5 in. piece of lime green cardstock. Cut a 1.75 in x 7 in piece of blue cardstock, ink edges with brown ink. Cut a 1.75 in x 5 in piece of dark green cardstock, ink edges with brown ink. Use Zutter binding machine or a rectangular punch, punch 3 holes in the four short ends of those dark green and blue cardstocks as shown. Adhere the blue to the dark green, where they overlap. Weave the ribbon as shown, adhere ribbon to the back sides of the pieces. Mat this cross section onto the lime green card back as shown. Rubberstamp “bouquet” (Club Scrap) image in black ink on lime green cardstock, color in image and ink edges with brown ink, mat onto dark green cardstock and adhere to card front in lower right hand corner as shown. Finished card is 5x7.
Good luck and have fun!
Debbie Weller
a.k.a. DebDuzScrappin
Thursday, January 1, 2009
Jewelry - Memory Wire Beaded Bracelet...
This bracelet is so fast and easy to make. It makes wonderful gifts that even your kids can help you make for their teachers. They also have memory wire  made for ring size and necklace size, the size here is the bracelet size.
Supply List:
Memory wire
Beads in varying size from small to large (Bistro Beads via Club Scrap)
Wire cutter
Needle nose pliers
Instructions:
1. Using your wire cutters, cut a section of memory wire about 3 and a half loops long.
2. Curl one end of the memory wire with pliers to create a small circle at the end of the wire.
3. Choose your color pattern and start beading. I generally don't layout my beads and plan anything, I just start beading following the 5 small, 1 large pattern, but have all sorts of various beads in those sizes.
4. Once you have the entire strand beaded, use the pliers again and curl the end into another small circle.
How easy is that? Good luck and have fun!!
Debbie Weller
DebDuzScrappin.com
 made for ring size and necklace size, the size here is the bracelet size.
Supply List:
Memory wire
Beads in varying size from small to large (Bistro Beads via Club Scrap)
Wire cutter
Needle nose pliers
Instructions:
1. Using your wire cutters, cut a section of memory wire about 3 and a half loops long.
2. Curl one end of the memory wire with pliers to create a small circle at the end of the wire.
3. Choose your color pattern and start beading. I generally don't layout my beads and plan anything, I just start beading following the 5 small, 1 large pattern, but have all sorts of various beads in those sizes.
4. Once you have the entire strand beaded, use the pliers again and curl the end into another small
 circle.
How easy is that? Good luck and have fun!!
Debbie Weller
DebDuzScrappin.com
Tuesday, December 30, 2008
Address Book project....
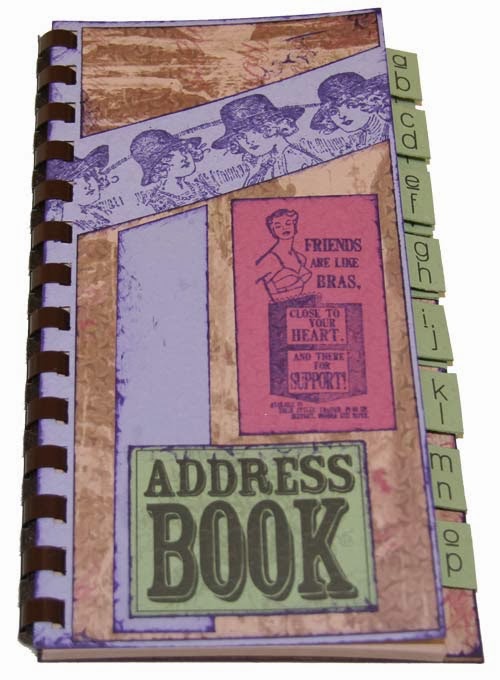
I also got to *finally* use one of my favorite CS rubberstamps "Friends are like bras, close to your heart...and there for support!" Too funny!!!
Sunday, December 28, 2008
Domino Wall Art

16 Dominos
Gold ink: Brilliance
Copper ink: Brilliance
Black ink: Stazon
All rubberstamps: Club Scrap
Glue: Crafter’s Pick
Black acrylic paint
Mat board
Heat gun
Instructions:
1. Ink edges and the back (flat) side of 8 Dominoes in gold ink and 8 Dominos in copper ink. You will need to heat set each side as you ink it to set the ink and make it dry.
2. Once ink is dry, arrange your dominos as shown in diagram.
3. Choose your rubberstamps and stamp images and sentiments with black Stazon ink, let dry.
4. Ink top edges of each domino to sort of “frame” the words and images. You can do this either direct-to-pad or using a sponge for a softer look. Let dry.
5. Cut a piece of mat board just under 5in x 5in. Paint the center of the mat board black. Let dry.
6. Apply glue to mat board all around the edges (not in the very center where there will be no domino) and start adhering the dominos to the mat board. I also put a bit of glue on the edges of the dominoes to ensure they would hold together (especially on those few dominos that hang over the edge of the mat board).
7. Glue hanger to back of mat board, let dry.
Finished wall hanging is approximately 7in x 7in.
Good luck and have fun!!
Debbie Weller
DebDuzScrappin.com

Subscribe to:
Posts (Atom)
LinkWithin
