Welp the time has FINALLY come...and I am off...so no posts for a week!!!
What could be better but scrappin' and cruisin' at the same time??? I tell you what, there's nothing better than the fantastic folks at ClubScrap to host a fantastic vacation like this!!
DebDuzScrappin'
Saturday, April 25, 2009
Friday, April 24, 2009
Project Tutorial - "Flair" Step 4 instructions
STEP FOUR Instructions
(Steps 1-3 and Supply list posted on previous days)
1. Take 2 roundpins and thread on 3 beads.
2. Bend the ends of both pins, about 1/4 inch from the tail end, and about 3/4 inch from the rounded end.
3. Add a touch of glossy accents and try to work it into the insides of the beads, and lay them carefully to dry, so that they will sit nicely on the finished butterfly. Let dry.
4. Once dry, adhere this beaded section onto the back of the butterfly using the glossy accents. and let dry.
5. Once dry, flip over and adhere the pin back onto the bottlecap. Let dry.
Hope you enjoyed this series of tutorials, leave me a comment if you did.
Thanks for stopping by. DebDuzScrappin'
Thursday, April 23, 2009
Project Tutorial - "Flair" Step 3 instructions
STEP THREE Instructions
Other steps are posted over the past few days as well as the supply list.
1. Take the butterfly by the bended wings and fold the extra little flat from the head and tail.
2. Put a dollop of glue into the center larger bead.
3. Insert the little flaps of the butterfly into the large bead in the glossy accents.
4. Let this dry overnight.
STEP FOUR will post tomorrow.
Thanks for stopping by....DebDuzScrappin'
Wednesday, April 22, 2009
Project Tutorial - "Flair" Step 2 instructions
Now onto Step TWO of the instructions for creating the Flair, see past two days for step one and supply list.
Step TWO:
1. Punch out circles of cardstock and rubberstamp an image onto it.
2. Ink edges of circles.
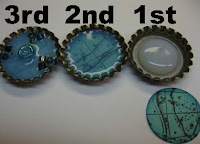
3. Pour a dollop of Glossy Accents (GA) into a bottle cap.
4. Insert circlular disc into the bottle cap in the glossy accents, and push down. The GA will come up over the disc, add more GA to cover the disc.
5. Add a large center bead with the hole facing up.
6. Add smaller beads in various spots around the outer edge of the bottle cap. Let the all dry. It will probably take overnight.
Step THREE will post tomorrow....
Thanks for stopping by...DebDuzScrappin'
Tuesday, April 21, 2009
Project Tutorial - "Flair" Step 1 instructions
(Supply list posted yesterday)
Instructions to create "Flair"
Step One:
1. Rubberstamp "Butterfly" Image (ClubScrap) with black ink on light and dark shads of teal cardstock.
2. Using a foam brush, paint on a layer of modge podge onto the face of the image. Let dry.
3. Repeat step 2 but on the back side of the cardstock of the image. Let dry.
4. Repeat 2 & 3 to give a 2nd coat. Let dry. This will give the image some water resistance, in the event the brooch gets wet by rain or what have ya.
5. Trim out the butterflies, leaving a small strip of cardstock at the 'head' and 'tail of the butterfly. We will be using these little strips to adhere the butterfly to the brooch.
6. Use a bone folder and score two lines, one along each edge of the butterflies body.
7. Bend the wings up slightly.
Step 2 will be posted tomorrow...more to come...
Thanks for stopping by...DebDuzScrappin'
Monday, April 20, 2009
Project Tutorial - "Flair"
Ok soooo not sure if I mentioned it or not...but I am going on a CRUISE!!!! Yes in just a short 2 week period I will be gone south to the warmth and bright skies of Florida and then the fabulous Caribbean area!!
I am going to be hanging with my most favorite gang from CLUB SCRAP...yes they are the bestest gals ever!! It is their 10 year anniversary and to celebrate we are crusin' up a storm.
We are going to be in various ports 5 of the days but the two all day at sea days - will be scrapbooking workshops put on by the fabulous gals at ClubScrap - they really do have the BEST workshops. Those gals are beyond amazing and what they share with the rest of us!!
Soooo anyways, as part of the cruise - we are suppose to create "Flair" to exchange with other gals. Flair, by their definition, is a small 1x1 inch piece of artwork, signed on the back, that is adhered to a pin, that you can wear. So in that spirit, I went to work, and this is what I came up with.
Supply list:
Modge Podge
Bottle caps
Glossy accents
Large & Small beads
Cardstock
Rubberstamps
Ink
Stickles
Eyepins
Pin backs
Ok so I will post the instructions over the next couple of days. I have to go get packin' for that cruise!!!
Thanks for stopping by....DebDuzScrappin'
Sunday, April 19, 2009
Card - Rainbow Froggys
More rainbow cards....are you sick of them yet???
Supply list:
Cardstock
Rubberstamps (Frog is from ClubScrap)
Black ink
Instructions:
1. Cut (7) one inch strips from 7 different colors of cardstock.
2. Ink edges of all the pieces.
3. Temporarily adhere them to a surface you can remove them from and stamp the froggy image repeatedly.
4. Remove from temporary surface and adhere to the black background cardstock.
Thanks for stopping by. DebDuzScrappin'
Saturday, April 18, 2009
Friday, April 17, 2009
Cards - Rainbow Jump for Joy
Thursday, April 16, 2009
Cards - Rainbow of Frogs
This is a pretty simple card to make.
Supplies needed:
>9 circles of cardstock in varying shades of the rainbow
>Rubberstamps
>Black ink pad
>sponge
>Black card stock
Punch out the 9 circles, and rubberstamp the frogs onto the circles. Ink all the edges of the circles. Adhere to card back.
Enjoy!
Thanks for stopping by...
DebDuzScrappin
Wednesday, April 15, 2009
Cards - Rainbow Fish
This is an easy technique to create 2 cards fairly quickly.
Supplies:
8 shades of colored cardstock
Rubberstamps (ClubScrap)
Ink
Adhesive
Instructions:
1. Just use a 2 inch square punch and punch out 8 squares from 8 colors of cardstock in the shades of the rainbow.
2. Cut each square in half diagonally.
3. Ink edges.
4. Adhere pieces to black card backing as shown.
5. Stamp images or images.
If you have a single large image, you may want to temporarily adhere it to a removable surface, stamp the image and then move to the final card backing.
DebDuzScrappin'
Tuesday, April 14, 2009
Card - Rainbow Flutterby
Monday, April 13, 2009
Kids: Mickey Mouse Party Invites
My son's birthday is coming and he is inviting a few boys and a girl - so we needed a theme that'd work for everyone. Since we just got back from Disney, that seemed most appropriate and what he chose.
We just used various household items to create the main Mickey Mouse shape out of black cardstock.
Then I added a strip of red cardstock to the lower half of the invitation, and trimmed to match the black Mickey shape.
Used a black pen and added 'fake' stitching around the red piece.
Used my sizzix machine and cut out the "M" in yellow.
Added white buttons (or faux buttons) and ribbon.
I will print the actual invite instructions/details on white and cut to adhere to the backside of this.
Thanks for stopping by...DebDuzScrappin'
Sunday, April 12, 2009
Happy Easter!!
Saturday, April 11, 2009
Project Tutorials - Decorative Boxes
“Dream” Rectangular box
All stamp images are Club Scrap.
BOTTOM: Cut brown cardstock 2in x 6.5in for outer bottom. Stamp “flowers” image in brown repeated across entire piece of outer bottom. Cut another brown cardstock 2in x 6in for inside bottom piece. Using bookbinding glue, adhere the two pieces together, offsetting by 1/8th of an inch. Score a line at 1in, 3in, 4in, and 6in. Fold into a rectangle, and adhere extra .5 inch flap inside box. Ink all edges with brown ink. Cut a piece (approx. 15/16ths inch x 1 15/16ths inch) of brown cardstock to fit inside at the base. Adhere, let dry.
TOP: Cut 2 pieces of brown cardstock 1in x 6.5in for outer/inner top. Using bookbinding glue, adhere the two pieces together. Score a line at 1 1/16in, 3 1/8in, 4 3/16in, and 6 1/4in. Stamp “Dream” centered in front and back. Fold into a rectangle, and adhere extra .5 inch flap inside box. Ink all edges with brown ink. Cut a piece 1 1/8 x 2 1/8 inch of brown cardstock to cover top. Adhere. Poke holes and cut a section of wire about 5 inches long. Loop the end of wire, insert from inside to top and add various beads, insert back into the inside, loop end of wire.
Here are some more varieties…the oval pendant necklaces are from CLUB STAMP IVORY ELEGANCE KIT.
Good luck and have fun!!
Debbie Weller
DebDuzScrappin.com
Friday, April 10, 2009
Card - Handstitched Blossom Inchies - Red & Purple
Hand Stitched Blossom Inchies
Here is the list of supplies needed:
• Cardstock
• Rubberstamps
• Ink
• Scissors
• Stickles
• Blossoms
• Ribbon, Fibers
The same basic steps are taken for each of the cards in this batch of examples:
1. Start by picking out 3 different cardstocks that all compliment one another in a certain color family (i.e. reds, yellows, blues, etc).
2. Start each ‘inchie’ as a 1.5x1.5 inch punched square, the 2nd layer will be a smaller torn square or rectangular piece, and the top layer will be a 1x1 inch punched square.
3. Ink all the edges with complimentary ink color.
4. Adhere the 3 cardstocks together, laying them in different angles, tilting them to the left and right.
5. Adhere a small matching blossom to the stack of inchies. [optional: If you choose not to use a blossom at this point, you can rubberstamp an image, add a button, bead, or whatever you like at this point instead.]
6. Poke a hole through the center of the blossom and all 3 pieces of cardstock. Stitch the blossom on going around all the cardstock layers and through the center of the flower, at about 7 times.
7. Using stickles in complimentary colors – embellish the inches. Let dry.
8. Adhere inchies to the cards and finish embellishing the cards as shown.
RED card
Cut a piece of red patterned cardstock (Club Scrap) 8.5in x 5.5in. Fold in half. Ink edges. Create 2 small sets of inchies and 1 larger inchies as described above using stamped images (Circle swirly – ClubScrap; “open your arms” ClubScrap; small “I love you” cut-out – ClubScrap). Adhere to the card front. Attach a larger red blossom with a envelope enclosure snap eyelet. Do final embellishing with red stickles. Let dry. Finished card measures 4.25in x 5.5in.
PURPLE card
Cut a piece of purple textured/patterned cardstock (ClubScrap) 8.5in x 5.5in. Fold in half. Ink edges. Create 3 sets of inchies as described above using stamped images (“Fresh from the garden” image – ClubScrap; “Hibiscus” image – ClubScrap) in black ink & gold floss. Adhere to the card front. Attach large purple blossom with a button center.. Do final embellishing with purple stickles. Let dry. Finished card measures 4.25in x 5.5in.
Thursday, April 9, 2009
Kids: Overcoming Spring Break boredom!!! Rainbow Tyme!
Rainbow Suncatcher!!!
Yes I am still on my rainbow kick!!! Sorry - hopefully it will run its course with me before too long!!
So in order to keep the kiddos busy over Spring Break, this is one of the projects I saw online at 5 Orange Potatoes Blog (she has all the instructions over there) and was excited to have the boys do as "Teacher Appreciation" gifts...I know we have a few weeks before then, but never too soon to get it done if you ask me.
It is a very simple project. All you really need is:
Wagon Wheel pasta noodles
Drops of food coloring
Rubbing Alcohol (or I think you can use vinegar too)
Glue
Transparency
ziplock baggies
It really is a two day project. The first day you need to color the pasta and layout to dry. The second day you can create your Rainbow Suncatcher.
I used a transparency as the background working surface, so that when we cut the final dried rainbows out - you hopefully won't really see the transparency and you can hand this lovely project in your window!!
All I did was add a splash of rubbing alcohol and some drops (add a few, then more, depending on how dark you want your colors) to the pasta in a ziplock baggy. Zip it closed and shake it up distributing the colors throughout. Lay these pasta pieces out on some wax paper to dry overnight.
The next day, you can use a washable marker on the one side of the transparency to draw an outline of your rainbow to follow as a pattern, but flip it over and do the gluing on the opposite side, then flip it back over and wash the marker off when you are done.
Wednesday, April 8, 2009
Card - Handstitched Blossom Inchies - Yellow & Teal
Hand Stitched Blossom Inchies
Here is the list of supplies needed:
• Cardstock
• Rubberstamps
• Ink
• Scissors
• Stickles
• Blossoms
• Ribbon, Fibers
The same basic steps are taken for each of the cards in this batch of examples:
1. Start by picking out 3 different cardstocks that all compliment one another in a certain color family (i.e. reds, yellows, blues, etc).
2. Start each ‘inchie’ as a 1.5x1.5 inch punched square, the 2nd layer will be a smaller torn square or rectangular piece, and the top layer will be a 1x1 inch punched square.
3. Ink all the edges with complimentary ink color.
4. Adhere the 3 cardstocks together, laying them in different angles, tilting them to the left and right.
5. Adhere a small matching blossom to the stack of inchies. [optional: If you choose not to use a blossom at this point, you can rubberstamp an image, add a button, bead, or whatever you like at this point instead.]
6. Poke a hole through the center of the blossom and all 3 pieces of cardstock. Stitch the blossom on going around all the cardstock layers and through the center of the flower, at about 7 times.
7. Using stickles in complimentary colors – embellish the inches. Let dry.
8. Adhere inchies to the cards and finish embellishing the cards as shown.
YELLOW card
Cut a piece of yellow patterned cardstock (Club Scrap) 8.5in x 5.5in. Fold in half. Ink edges. Create 2 sets of inchies as described above using buttons at the center embellishment. Adhere to the card front. Attach another 1.5x1.5 piece with a larger yellow blossom using a flower brad. Cut a yellow tag (ClubScrap) with sentiment and rubberstamp “Fleur” image (ClubScrap) in black ink on tag. Ink edges with terra cotta ink. Adhere to card front as shown. Do final embellishing with yellow stickles. Let dry. Finished card measures 4.25in x 5.5in.
Tuesday, April 7, 2009
Cards - Stitched Blossoms - Yellow & Orange
Stitched Blossoms
Here is the list of supplies needed:
• Cardstock
• Rubberstamps
• Ink
• Scissors
• Stickles
• Blossoms
• Ribbon, Fibers
The same basic steps are taken for each of the cards in this batch of examples:
1. Start by picking out 3 different cardstocks that all compliment one another in a certain color family (i.e. reds, yellows, blues, etc).
2. Cut or tear the edges of the 3 cardstocks so that there is one large one (roughly 4x5.25in), a medium one (roughly 3.5x5) and a small one (roughly 3x4).
3. Ink all the edges with complimentary ink color.
4. Adhere the 3 cardstocks together, laying them in different angles, tilting them to the left and right.
5. Adhere the blossom to the card.
6. Rubberstamp images onto cardstock as desired, or add small pieces of cardstock with images in various spots.
7. Poke a hole through the center of the blossom and all 3 pieces of cardstock. Stitch the blossom on going around all the cardstock layers and through the center of the flower, at least 4 times, more if looks good.
8. Using stickles in complimentary colors – embellish the cards. Let dry.
9. Adhere the card front to the card back.
YELLOW card
Used patterned paper (Club Scrap) for card backing. Used two shades of yellow and one black cardstock for card front base, embellished with 4 small 1x1 inch squares, each stamped with ‘cross’ (Club Scrap) image and a small flower brad. Stamp “Just wanted to say HI” (Club Scrap) sentiment. Embellish with yellow stickles and gold star brads. Yellow fabric blossom stitched on with gold ribbon. Finished card measures 4.25in x 5.5in.
ORANGE card
Used three shades of orange cardstock for card front base, one of which was an orange tag (Club Scrap) that said “thanks”. Embellished with 2 small 1x1 inch squares, each stamped, one with ‘cross’ (Club Scrap) image and one with “set of starbursts” (ClubScrap) image. Embellished stamped images with button & flower brads. Stamp “Heart arrow” (Club Scrap) in black ink. Embellish with copper stickles. Orange fabric blossom stitched on with orange fibers. Finished card measures 4.25in x 5.5in.
Please leave me a comment! Thanks Deb
Monday, April 6, 2009
Cards - Stitched Blossoms - Purple
Stitched Blossoms
Here is the list of supplies needed:
• Cardstock
• Rubberstamps
• Ink
• Scissors
• Stickles
• Blossoms
• Ribbon, Fibers
The same basic steps are taken for each of the cards in this batch of examples:
1. Start by picking out 3 different cardstocks that all compliment one another in a certain color family (i.e. reds, yellows, blues, etc).
2. Cut or tear the edges of the 3 cardstocks so that there is one large one (roughly 4x5.25in), a medium one (roughly 3.5x5) and a small one (roughly 3x4).
3. Ink all the edges with complimentary ink color.
4. Adhere the 3 cardstocks together, laying them in different angles, tilting them to the left and right.
5. Adhere the blossom to the card.
6. Rubberstamp images onto cardstock as desired, or add small pieces of cardstock with images in various spots.
7. Poke a hole through the center of the blossom and all 3 pieces of cardstock. Stitch the blossom on going around all the cardstock layers and through the center of the flower, at least 4 times, more if looks good.
8. Using stickles in complimentary colors – embellish the cards. Let dry.
9. Adhere the card front to the card back.
PURPLE card
Used patterned paper (Club Scrap) for card backing. Used three shades of purple cardstock for card front base. Embellish with purple stickles and a single purple button (in the center of the flower). Purple blossoms stitched on with purple fibers. Finished card measures 4.25in x 5.5in.
Sunday, April 5, 2009
Cards - Stitched Blossoms - Pink & Red
Stitched Blossoms
Here is the list of supplies needed:
• Cardstock
• Rubberstamps
• Ink
• Scissors
• Stickles
• Blossoms
• Ribbon, Fibers
The same basic steps are taken for each of the cards in this batch of examples:
1. Start by picking out 3 different cardstocks that all compliment one another in a certain color family (i.e. reds, yellows, blues, etc).
2. Cut or tear the edges of the 3 cardstocks so that there is one large one (roughly 4x5.25in), a medium one (roughly 3.5x5) and a small one (roughly 3x4).
3. Ink all the edges with complimentary ink color.
4. Adhere the 3 cardstocks together, laying them in different angles, tilting them to the left and right.
5. Adhere the blossom to the card.
6. Rubberstamp images onto cardstock as desired, or add small pieces of cardstock with images in various spots.
7. Poke a hole through the center of the blossom and all 3 pieces of cardstock. Stitch the blossom on going around all the cardstock layers and through the center of the flower, at least 4 times, more if looks good.
8. Using stickles in complimentary colors – embellish the cards. Let dry.
9. Adhere the card front to the card back.
PINK card
Used four shades of pink for card front base, Stamp “happy” (Club Scrap) image/sentiment and ‘dashed circle’ (ClubScrap) image in black ink. Embellish with clear stickles, a single bead (at center of flower), and paper flower. Pink fabric blossom stitched on with gold floss. Finished card measures 4.25in x 5.5in.
RED card
Used patterned paper (Club Scrap) for card backing. Used two shades of red cardstock for card front base. Stamp “You’re red hot” (Club Scrap) sentiment in black ink. Embellish with red stickles and red heart brads. In center of blossom, there is a stamped image (ClubScrap) on a punched out circle. Red blossom stitched on with red frilly fibers. Finished card measures 4.25in x 5.5in.
Please leave me a comment. Thanks!
Saturday, April 4, 2009
Altered - Mini Serving Tray Frame
This is one of my all time favorite kits that Clubscrap has put out - this is a lil tiny serving tray - all you could really serve on it - would be a coffee cup and maybee some cookies...but of course I chose to turn it into a Frame and I keep it at my desk at work.
Supplies:
Serving tray
Rubberstamps
Ink
Tissue paper (gift wrap type)
mosaic tiles
White paint
modge podge
crafter's pick adhesive
ribbons, charms, beads
1. Paint the tray white and let dry.
2. Stamp leaf & word images onto white tissue paper and trim out.
3. adhere the tissue paper images to the tray by applying an thin coat of modge podge and then laying the image onto it. Let dry.
4. Mat photo and adhere to center of tray.
5. Using crafter's pick adhesive, glue mosaic tiles across to top and below the photo. Let dry.
6. Run a bead of glue around the entire inside edge of the tray and add various beads. Let dry.
7. Add ribbons, fibers, charms, etc to the top handle.
Hope you give this a try - it is a wonderful project!!
Debbie Weller aka DebDuzScrappin.com
Supplies:
Serving tray
Rubberstamps
Ink
Tissue paper (gift wrap type)
mosaic tiles
White paint
modge podge
crafter's pick adhesive
ribbons, charms, beads
1. Paint the tray white and let dry.
2. Stamp leaf & word images onto white tissue paper and trim out.
3. adhere the tissue paper images to the tray by applying an thin coat of modge podge and then laying the image onto it. Let dry.
4. Mat photo and adhere to center of tray.
5. Using crafter's pick adhesive, glue mosaic tiles across to top and below the photo. Let dry.
6. Run a bead of glue around the entire inside edge of the tray and add various beads. Let dry.
7. Add ribbons, fibers, charms, etc to the top handle.
Hope you give this a try - it is a wonderful project!!
Debbie Weller aka DebDuzScrappin.com